
Backing up your iPhone is essential to ensure that your personal data, apps, settings, and photos are safe in case of device loss, damage, or when upgrading to a new iPhone. Apple provides two primary methods for backing up your iPhone: iCloud and local backup through a computer.
1. Backing Up Your iPhone to iCloud
iCloud is Apple’s cloud storage service that allows you to back up your iPhone data remotely over the internet. It offers several advantages:
- Automatic Backups: iCloud backups occur automatically when your iPhone is connected to Wi-Fi, plugged in, and locked.
- Accessibility: You can access your backup from any Apple device with your Apple ID, making it easy to restore your data to a new iPhone or any other iOS device.
- No Need for Physical Storage: iCloud backups are stored in the cloud, so you don’t need to worry about running out of physical storage space on your computer.
Steps to Back Up Your iPhone to iCloud
1.Connect to Wi-Fi: Ensure your iPhone is connected to a Wi-Fi network. Backups over cellular data may be slower and use up your data plan.
2.Sign in to iCloud:
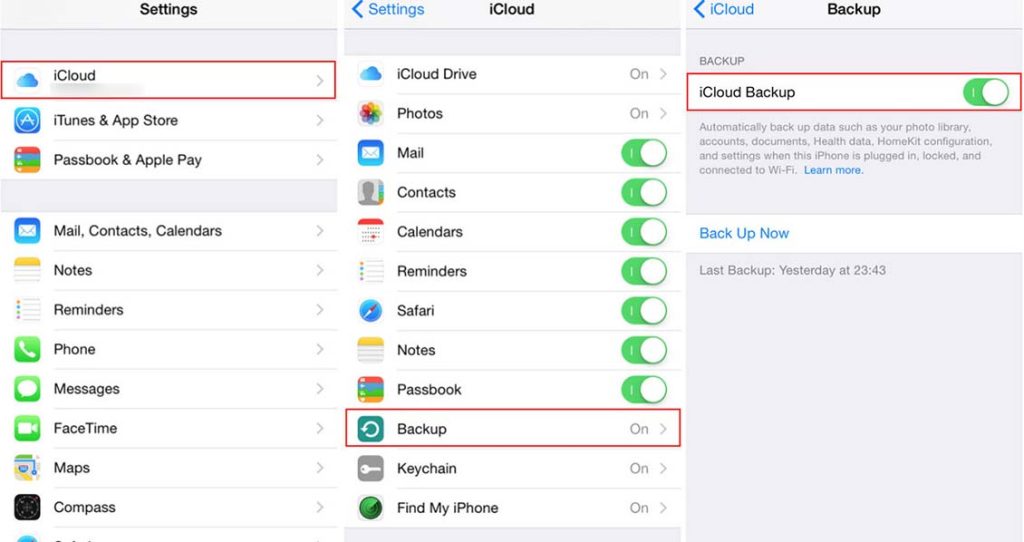
- Open the Settings app.
- Tap on your name at the top of the screen to access Apple ID settings.
- Select iCloud.
3.Enable iCloud Backup:
- In the iCloud settings, tap on iCloud Backup.
- Toggle the switch to turn on iCloud Backup if it’s not already enabled.
4.Manually Start a Backup:
- Tap on Back Up Now to start the backup process manually. Ensure your iPhone remains connected to Wi-Fi throughout the process.
5.Verify Backup Completion:
- Once the backup is complete, you can verify it by going to Settings > [Your Name] > iCloud > iCloud Backup. Here, you’ll see the date and time of your last backup.
Managing iCloud Backups
- Check Storage Usage: To monitor your iCloud storage usage, go to Settings > [Your Name] > iCloud > Manage Storage. Here, you can see how much space is used and which apps are backed up.
- Upgrade Storage Plan: If you need more storage, you can upgrade your iCloud plan. Go to Settings > [Your Name] > iCloud > Manage Storage > Change Storage Plan.
- Delete Old Backups: If you need to free up space, you can delete old backups by going to Settings > [Your Name] > iCloud > Manage Storage > Backups, then select the backup you want to delete.
Troubleshooting iCloud Backup Issues
- Check Wi-Fi Connection: Ensure you have a stable Wi-Fi connection. A poor connection may interrupt the backup process.
- Verify iCloud Storage: Make sure you have enough iCloud storage available. If your storage is full, you may need to upgrade your plan or manage existing backups.
- Restart Your Device: Sometimes, restarting your iPhone can resolve backup issues. To restart, press and hold the power button until the slider appears, then slide to power off. Turn your device back on by pressing and holding the power button.
2. Backing Up Your iPhone to a Local Computer
Backing up your iPhone to a local computer offers several benefits:
- No Internet Required: Local backups don’t rely on an internet connection, which can be useful if you have limited or unreliable internet access.
- Complete Control: You have complete control over the backup process and storage location, making it easy to manage and access your backups.
Backing Up to a Mac
1.Connect Your iPhone to Your Mac:
- Use a USB cable to connect your iPhone to your Mac.
2.Open Finder (macOS Catalina and later):
- Click on the Finder icon in the Dock.
- Select your iPhone from the sidebar under Locations.
3.Trust Your Computer:
- If prompted, click Trust on your iPhone and enter your passcode to establish a connection.
4.Select Backup Options:
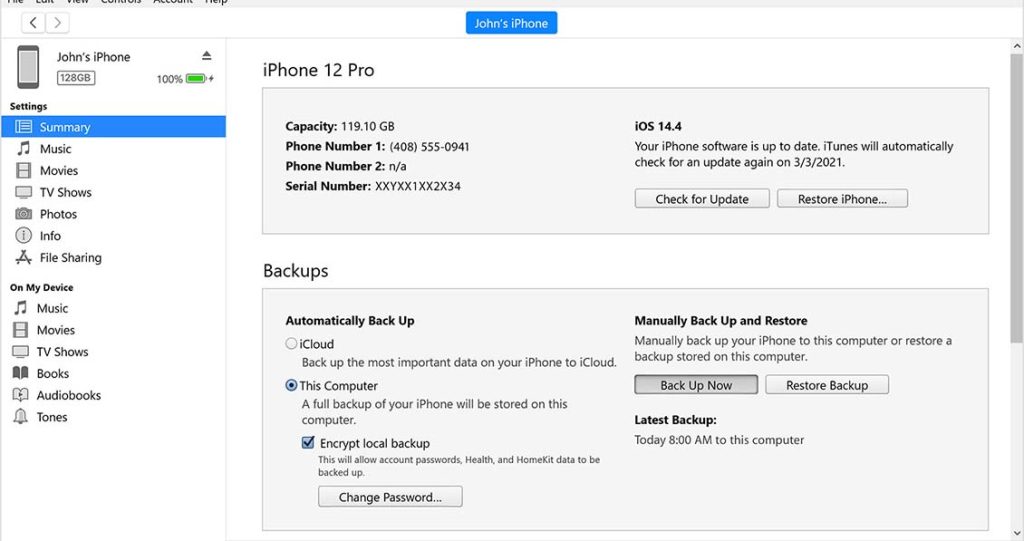
- In the Finder window, select the General tab.
- Choose Back up all of the data on your iPhone to this Mac. You can also select Encrypt local backup if you want to include sensitive data like passwords and health data.
5.Start the Backup:
- Click Back Up Now to initiate the backup process. Your data will be saved to your Mac’s local storage.
6.Verify Backup Completion:
- Once the backup is complete, you can verify it by checking the date and time of your last backup in Finder under General > Manage Backups.
Backing Up to a Windows PC
1.Install iTunes:
- Download and install the latest version of iTunes from the Apple website if you don’t already have it.
2.Connect Your iPhone to Your PC:
- Use a USB cable to connect your iPhone to your Windows PC.
3.Open iTunes:
- Launch iTunes and select your iPhone from the device list in the upper-left corner.
4.Trust Your Computer:
- If prompted, click Trust on your iPhone and enter your passcode.
5.Select Backup Options:
- In iTunes, go to the Summary tab.
- Choose This Computer under Backups. You can also select Encrypt iPhone backup to include sensitive data.
6.Start the Backup:
- Click Back Up Now to start the backup process. Your data will be saved to your computer’s local storage.
7.Verify Backup Completion:
- Check the date and time of your last backup in iTunes under Summary > Latest Backup.
Managing Local Backups
- Locate Backup Files:
- On a Mac, iPhone backups are stored in
~/Library/Application Support/MobileSync/Backup/. - On a Windows PC, backups are stored in
\Users\[Username]\AppData\Roaming\Apple Computer\MobileSync\Backup\. - Free Up Space:
- If you need to free up space on your computer, you can delete old backup files from the backup location. Be cautious to delete only the files you don’t need.
Troubleshooting Local Backup Issues
- Check USB Connection: Ensure the USB cable and ports are functioning properly. Try a different cable or port if the connection is unstable.
- Update Software: Make sure you have the latest version of iTunes or macOS to ensure compatibility with your iPhone.
- Restart Devices: Restart both your iPhone and computer if you encounter issues with the backup process.
3. Choosing the Right Backup Method for You
Considerations for Choosing iCloud Backup:
- Convenience: Ideal if you prefer an automated backup process and access to your backups from multiple devices.
- Internet Access: Suitable if you have a stable and reliable internet connection.
- Storage Management: Best if you don’t want to manage physical storage devices.
Considerations for Choosing Local Backup:
- Offline Backup: Ideal if you have limited internet access or prefer to manage backups on your own hardware.
- Speed: Faster backup and restoration times, especially for large amounts of data.
- Complete Control: Best if you want complete control over your backup storage and process.
Hybrid Approach:
Many users find a hybrid approach beneficial, using both iCloud and local backups to ensure comprehensive data protection. For example, you can use iCloud for regular, automatic backups and perform occasional local backups for additional security.
Backing up your iPhone is a crucial step in safeguarding your data and ensuring that you can recover it in case of device loss, damage, or upgrade. Whether you choose to back up to iCloud, a local computer, or both, understanding the steps and best practices for each method will help you make informed decisions and protect your valuable information.